Lever Balance

Levers
Use the lever principle to practice multiplication and addition. The principle says that the force exerted by a mass on one side of a lever is equal to the mass times its distance from the pivot point, the fulcrum. The forces on one side from several masses add up to give the total force. The total forces on the two sides must be equal for the lever to be in balance.
Examples
You have a 3-unit weight and a 5-unit weight to put on opposite sides of the fulcrum. Where should they be put to balance? The answer to this can be distances 5 and 3, but it can also be 10 and 6, or even larger answers like 15 and 9.
If you have a 3-unit and a 5-unit weight to put on one side of a lever, which weights can you put at which distances on the other side? What if the two weights are on different sides of the lever? This question continues the questions on the Make It Count page at the end of Stage 4.
Bonus Material
Levers
The lever principle states that the force exerted on one side of a lever by a mass is equal to the mass times its distance from the pivot point, the fulcrum.
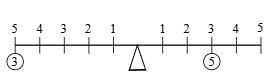
In the lever above, the 3 on the left side is a distance of 5 from the fulcrum, so its force is 3 x 5 = 15. The 5 on the right side is a distance of 3 from the fulcrum, so its force is 5 x 3 = 15. This lever is in balance.
If there is more than one weight on a side, the forces will add up.
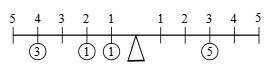
In this lever, there is 3 x 4 + 1 x 2 + 1 x 1 = 15 on the left side, and 5 x 3 = 15 on the right side. So it is in balance.
We will restrict these problems to only use whole numbers. You can decide whether you allow multiple weights to be hung off of the same point – we will assume it’s okay to do multiple weights in the discussion that follows.
Lever Puzzles
You have a 3-unit weight and a 5-unit weight to put on opposite sides of the fulcrum. Where should they be put to balance? The answer to this can be the distances 5 and 3, but it can also be 10 and 6, or even larger answers such as 15 and 9. Be open to discussing whatever your child comes up with.
If you have a 3-unit and a 5-unit weight to put on one side of a lever, which weights can you put at which distances on the other side? This question continues the questions on the Make It Count page at the end of Chapter 4. As before, explore different combinations of weights. What happens if 3 and 5 are replaced by 4 and 5, 4 and 9, or 6 and 9?
How does this last problem change if we put the 3-unit and 5-unit weights on opposite sides of the fulcrum? Now it is easy to weigh a 1-unit weight by using 3 x 2 = 5 x 1 + 1 x 1. What other weights can you weigh this way?
Mobiles
You are given some weights and a design for a mobile that has some attach points. The challenge is to put at most one weight per attach point so the mobile will balance along every arm. For the sake of these problems, we will assume the wires that create the mobile are weightless. Each arm in the mobile is a lever that needs balancing, so these puzzles are an extension of the Lever Balance – practice those puzzles before starting these.
Start with the simplest mobiles, which are just levers in the air. Here is a solution for putting the weights from 1 to 4 on this mobile to balance it. This works as a lever with the fulcrum at the hanging point. For this mobile we have 2 x 4 + 1 x 2 = 4 x 1 + 3 x 2.
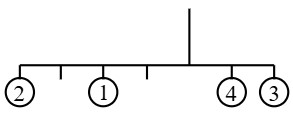
If there is more than one level to the mobile, then each individual arm on each level must balance as a lever. For this next mobile, the two bottom arms balance because 1 x 3 = 3 x 1 and 4 x 1 = 2 x 2. For the next level up, you just add up the weights below it. For example, the weight on the left side is 1 + 3 = 4 – as far as the next level up is concerned, it does not matter where on that bottom arm the weights are located. So, for the next level up, (1 + 3) x 3 = (4 + 2) x 2 = 12, so the top level balances as well.
Have fun making mobile puzzles for each other. Here is a last one to play with using each of the numbers from 1 to 6. Don’t worry about being fancy and using each number once. Any completed puzzle will be fun. Checking the levels we have: 2 x 2 = 4 x 1; 1 x 4 + (2 + 4) x 1 = 5 x 2; 3 x 2 = 6 x 1; and (1 + 2 + 4 + 5) x 3 = (3 + 6) x 4.
Helping your child
Investigations are meant for your child to play with and think about. Let your child explore these looking for interesting patterns and beautiful relationships. Resist the temptation to unveil what is going on and give the answer. If your child seems to have reached a dead end, suggest that they come back to the investigation at a future time to play with it again.
Many investigations benefit from organizing results, and this is a great thing for you to help your child with. Help them make tables, drawings, or whatever may help them see more easily what is going on. And of course, it is perfectly fine to give them gentle nudges from time to time in the right direction. Remember that your child will learn a lot by developing persistence and learning how to look more deeply at things.